Making a pizza crust recipe from scratch is one of the most rewarding experiences you can have in your kitchen. There is something truly special about mixing simple ingredients like flour, water, and yeast to create a foundation for your favorite toppings. Whether you prefer a thin, crispy base or a thick, chewy dough, mastering this basic skill will change the way you think about dinner time. This guide will walk you through every detail to help you create a reliable pizza crust recipe that your whole family will love.
Table of Contents
Why You Should Master This Pizza Crust Recipe
Total Quality Control Over Ingredients

When you use a homemade pizza crust recipe, you know exactly what is going into your food. Store-bought dough or frozen pizzas often contain preservatives, extra sugar, and processed fats that you might want to avoid. By making your own, you can choose high-quality organic flour and fresh yeast, and you can even control the amount of salt used. This level of control makes your meal healthier and much more flavorful than any mass-produced alternative you can find at the local grocery store. Plus, you can avoid common additives used to extend shelf life.
Saving Money While Eating Better
Following a pizza crust recipe is incredibly cost-effective. The basic components flour, yeast, salt, and water cost only a few cents per serving. Compared to ordering a delivery pizza or buying pre-made shells, the savings add up quickly over time. Even if you buy premium toppings like fresh mozzarella and high-quality vegetables, the total cost of a homemade pizza is significantly lower than a restaurant bill. It is a fantastic way to feed a large group or a hungry family without spending a fortune, all while providing a superior dining experience.
Print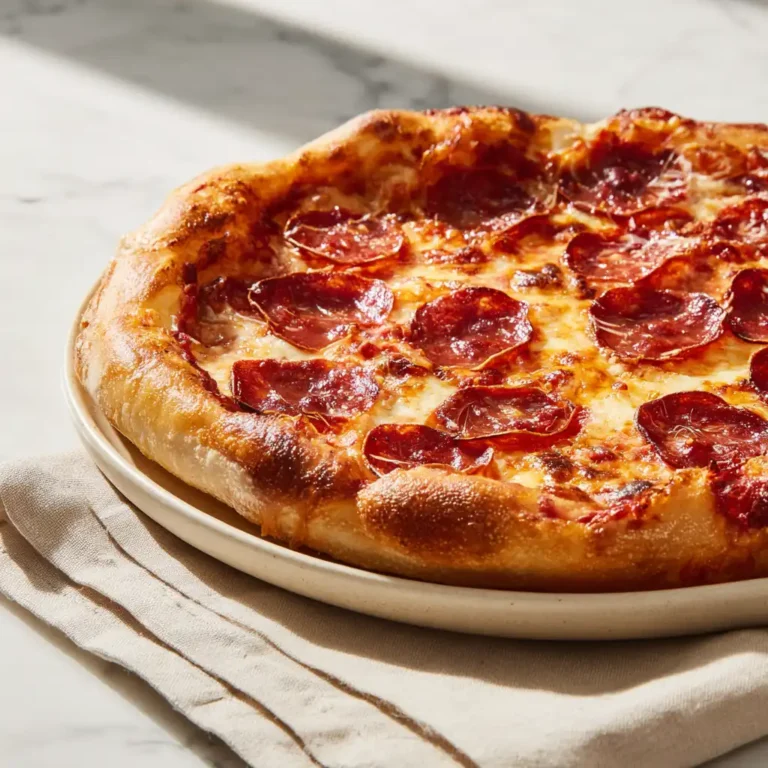
The Ultimate Guide to a Perfect Homemade Pizza Crust Recipe
A reliable and friendly guide to mastering a simple, crispy, and chewy pizza crust from scratch using basic pantry staples.
- Total Time: 1 hour 30 minutes
- Yield: 2 12-inch pizzas 1x
Ingredients
- 2 1/4 tsp Active Dry Yeast (1 packet)
- 1 1/2 cups Warm Water (110°F)
- 3 1/2 cups All-purpose Flour
- 2 tbsp Olive Oil
- 1 tsp Salt
- 1 tbsp Granulated Sugar
- Extra flour for dusting
Instructions
- Step 1: Proof Yeast – Combine warm water, sugar, and yeast in a bowl and let sit for 10 minutes until bubbly.
- Step 2: Mix Dough – Add olive oil, salt, and 2 cups of flour to the yeast mixture and stir well.
- Step 3: Add Flour – Gradually mix in the remaining flour until the dough pulls away from the sides of the bowl.
- Step 4: Knead Dough – Turn dough onto a floured surface and knead for 8 minutes until smooth and elastic.
- Step 5: First Rise – Place dough in a greased bowl, cover with a cloth, and let rise for 60 minutes in a warm spot.
- Step 6: Preheat Oven – Set your oven to 450°F (230°C) and prepare your baking sheet or pizza stone.
- Step 7: Shape Crust – Punch down the dough, divide into two, and roll out into 12-inch circles.
- Step 8: Final Bake – Add toppings and bake for 12-15 minutes until the crust is golden brown.
Notes
For a deeper flavor, let the dough ferment in the refrigerator for 24 hours before using.
- Prep Time: 15 minutes
- Cook Time: 15 minutes
- Category: Main Course
- Method: Baking
- Cuisine: Italian-American
- Diet: Vegan
Nutrition
- Serving Size: 1 slice
- Calories: 180 kcal
- Sugar: 1g
- Sodium: 220mg
- Fat: 3.5g
- Saturated Fat: 0.5g
- Unsaturated Fat: 3g
- Trans Fat: 0.01g
- Carbohydrates: 32g
- Fiber: 1.5g
- Protein: 5g
- Cholesterol: 0.1mg
Keywords: pizza crust, homemade dough, baking, yeast bread, dinner
The Science Behind a Great Pizza Crust Recipe
The Power of Gluten Development
Understanding how gluten works is vital for any pizza crust recipe. When you mix flour with water and begin to knead it, proteins in the flour link together to create a stretchy network called gluten. This network traps the gasses produced by the yeast, allowing the dough to rise and become airy. If you do not knead enough, your crust will be crumbly and weak. If you knead too much, it might become too tough. Finding that perfect balance is what gives the dough its characteristic chew and structure, making it strong enough to hold all your toppings.
How Yeast Works Its Magic
Yeast is the living component of your pizza crust recipe. These tiny organisms consume the sugars in the flour and release carbon dioxide as a byproduct. This process, known as fermentation, is what creates the bubbles in your dough. To understand the history and biology of this process, you can read about yeast and its role in baking. For a successful rise, you need to provide the yeast with a warm environment and enough time to work. Rushing this stage often leads to a flat, dense crust that lacks the complex flavor profile of a well-fermented dough.
Choosing the Best Flour for Your Pizza Crust Recipe
All-Purpose vs. Bread Flour
The type of flour you choose for your pizza crust recipe will significantly impact the final texture. All-purpose flour is a great starting point for beginners because it creates a tender and reliable crust. However, bread flour has a higher protein content, which leads to more gluten development. This results in a crust that is extra chewy and has those beautiful large air pockets often seen in artisan pizzas. Both options work well, but if you want that professional “snap” and chew, trying bread flour is a great way to see an immediate improvement in your results.
Looking at Italian 00 Flour
If you want to take your pizza crust recipe to a more traditional level, you might look for Italian “00” flour. This flour is milled extremely fine, almost like baby powder. It is the gold standard for Neapolitan-style pizzas because it can handle very high temperatures without burning too quickly. It creates a crust that is soft on the inside but has a delicate, crackly exterior. While it might be harder to find than standard flour, many specialty stores carry it. Using this flour can help you achieve that authentic restaurant-style finish in your home oven.
Mastering the Basic Ingredients
Water Temperature and Quality
Water is often overlooked in a pizza crust recipe, but its temperature is crucial. If the water is too hot, it will kill the yeast. If it is too cold, the yeast will stay dormant and won’t make the dough rise. Aim for “lukewarm” water, which is around 105 to 110 degrees Fahrenheit. If you have very hard water or water with a strong chlorine taste, using filtered water can help improve the overall flavor of your dough. This small change makes sure the yeast can thrive and do its job effectively throughout the fermentation process.
The Role of Salt and Oil
Salt is essential in a pizza crust recipe for two reasons: flavor and control. Without salt, your dough will taste bland and like cardboard. Salt also helps regulate the yeast, preventing it from growing too fast and making the dough collapse. Oil, such as olive oil, adds a bit of richness and helps the crust become golden and crispy in the oven. It also provides a barrier that helps prevent the dough from drying out. When you combine these with the right yeast, you get a dough that is both easy to handle and delicious to eat.
Step-by-Step Instructions for Your Pizza Crust Recipe

- Step 1: Activate the Yeast – Combine lukewarm water with a teaspoon of sugar and your yeast packet in a small bowl. Let it sit for about five to ten minutes until it becomes foamy and smells earthy.
- Step 2: Mix the Dry Ingredients – In a large mixing bowl, whisk together your flour and salt. If you are making a larger batch of this pizza crust recipe, make sure your bowl has plenty of extra space for mixing.
- Step 3: Combine Wet and Dry – Pour the yeast mixture and a splash of olive oil into the flour. Use a sturdy spoon or your hands to stir until a shaggy ball of dough starts to form and pull away from the bowl sides.
- Step 4: Knead the Dough – Turn the dough onto a floured surface. Push, fold, and turn the dough repeatedly for about 8 to 10 minutes. The dough should become smooth, elastic, and slightly tacky but not sticky.
- Step 5: First Rise – Place the dough ball into a lightly oiled bowl and cover it with a damp cloth. Put it in a warm, draft-free spot and let it rise for about one to two hours until it has doubled in size.
- Step 6: Shape the Pizza – Gently punch the air out of the dough and divide it into smaller portions. Stretch or roll each piece into your desired shape, keeping the thickness as even as possible across the surface.
- Step 7: Add Toppings – Spread a thin layer of sauce and your favorite meats like beef or chicken, and plenty of cheese. Avoid adding too many watery vegetables to prevent a soggy crust during the baking process.
- Step 8: Bake to Perfection – Place your pizza in a preheated oven at the highest setting possible, usually around 475 or 500 degrees Fahrenheit. Bake for 10 to 15 minutes until the edges are brown and the cheese is bubbly.


Techniques for a Perfect Crust Every Time
The Importance of Proper Kneading
Kneading is the stage where you build the foundation of your pizza crust recipe. Many people stop too early because their arms get tired, but pushing through those few extra minutes is worth it. You want to see the dough transform from a lumpy mass into a silky, bouncy ball. A good test is the “windowpane test,” where you stretch a small piece of dough thin enough to see light through it without it tearing. This shows that the gluten is strong enough to hold the structure of your pizza as it bakes and expands in the heat.
If you enjoy working with dough and seeing how different textures develop, you might find the process similar to making sourdough cinnamon bread, where patience and handling are key to the final product. Both recipes require you to respect the fermentation time to get the best results. Learning these manual skills makes you a much more confident baker in the long run, allowing you to feel when the dough is “ready” rather than just watching the clock.
Using Cold Fermentation for Flavor
One secret to a world-class pizza crust recipe is letting the dough rest in the refrigerator for 24 to 72 hours. This is called cold fermentation. During this time, the yeast works much slower, which allows complex flavors to develop that you simply cannot get with a quick one-hour rise. The cold temperature also changes the structure of the dough, making it easier to stretch very thin without tearing. If you have the time to plan ahead, this method will turn a good crust into an incredible one that tastes like it came from a high-end pizzeria.
Troubleshooting Common Pizza Crust Recipe Issues
What to Do if the Dough Won’t Rise
It can be frustrating when your pizza crust recipe fails to double in size. The most common culprit is dead yeast. Always check the expiration date on your yeast packets before starting. Another issue could be the temperature of your room; if your house is cold, the yeast will move very slowly. Try putting the bowl inside an oven that is turned off but has the light on. If you find your kitchen habits need a bit of a refresh for better results, checking out tips on things like an apple cider vinegar drink might remind you how acidity and temperature affect organic reactions in food.
Preventing a Soggy Bottom
Nobody likes a pizza that sags when you pick it up. This usually happens because there is too much moisture on top or the oven isn’t hot enough. To fix this in your pizza crust recipe, try using a pizza stone or a preheated heavy baking sheet. These tools hold heat and transfer it directly to the bottom of the crust immediately. Also, make sure to drain your fresh mozzarella or any wet vegetables before adding them. Getting that crispy, crunch texture is a goal for many, similar to how people look for the perfect crunch in baked cod with panko coatings.
Creative Variations for Your Pizza Dough
Thin and Crispy vs. Deep Dish
You can adapt this pizza crust recipe to fit your mood. For a thin and crispy version, roll the dough out very thin and use a fork to prick small holes across the surface, which prevents large bubbles from forming. For a thick, pan-style pizza, let the dough rise a second time directly in a well-oiled cake pan or cast-iron skillet. This allows it to puff up and create a soft, bread-like interior with a fried, crispy bottom. You can even try adding herbs like oregano or garlic powder directly into the flour for extra flavor in the dough itself.
For those who love a bit of extra texture and flavor on the edges, you can try making a “frico” style edge. This involves spreading cheese all the way to the very edge of the pan so it melts and fries against the metal, creating a crispy crown. This technique is often used in specialty sandwiches like frico grilled cheese, but it works wonderfully with pizza dough as well. It adds a salty, crunchy dimension to your pizza crust recipe that makes every bite of the crust just as exciting as the center of the pie.
Comparing Flour Ratios and Results

To help you decide how to tweak your pizza crust recipe, here is a quick comparison of how different flour types and hydration levels affect the outcome. Hydration refers to the amount of water relative to the amount of flour used in the dough.
| Flour Type | Hydration Level | Resulting Texture | Best Use Case |
|---|---|---|---|
| All-Purpose | 60% | Soft and tender | Standard home-style pizza |
| Bread Flour | 65% | Chewy and strong | New York style slices |
| 00 Flour | 70% | Light and airy | Wood-fired or high-heat ovens |
| Whole Wheat | 75% | Dense and nutty | Health-conscious recipes |
FAQs
Can I freeze the dough from this pizza crust recipe?
Yes, you can absolutely freeze the dough. After the first rise, divide the dough into portions and lightly coat each with oil. Place them in freezer-safe bags. When you are ready to use one, let it thaw in the refrigerator overnight and then bring it to room temperature for an hour before stretching. This makes it easy to have a quick homemade meal on busy weeknights without having to start from scratch every single time.
What is the best temperature for baking pizza?
Most home ovens should be set as high as they can go, usually between 475°F and 525°F. Professional pizza ovens reach over 800°F, which is why they cook so fast. By using a very high heat at home, you mimic that environment, helping the crust spring up quickly and develop a beautiful golden-brown color. Just make sure to keep a close eye on it, as things can go from perfect to burnt very quickly at those high temperatures.
How do I stop the dough from shrinking back when I stretch it?
If your dough keeps snapping back like a rubber band, it means the gluten is too tight. This often happens if the dough is still cold or if it hasn’t rested long enough. Simply cover the dough and let it sit on the counter for 15 to 20 minutes. This allows the gluten to relax, making it much easier to stretch out into a large circle or rectangle without it pulling back toward the center.
Final Thoughts on the Best Pizza Crust Recipe
Creating the perfect pizza crust recipe is a journey of practice and patience. Once you understand the basics of yeast, flour, and heat, you can make a meal that rivals any restaurant. Do not be afraid to experiment with different rise times or flour types to find the exact texture you love most. With these tips and steps, you are well on your way to becoming the designated pizza chef for your friends and family. Enjoy the process and the delicious results of your hard work!