Are you looking for a fun and relaxing craft project that results in a super cute toy? Learning how to make a realistic butter squishy at home is a fantastic way to spend an afternoon. These slow-rising toys are incredibly satisfying to squeeze and look just like the real thing sitting on your kitchen counter. In this guide, we will walk you through every step to create your own buttery masterpiece using simple materials you can find at most craft stores.
Table of Contents
Understanding the Appeal of Butter Squishies
Before we jump into the steps of how to make a realistic butter squishy at home, it helps to understand why these specific shapes are so popular. Squishies are soft toys made from a specialized foam that compresses when squeezed and slowly returns to its original shape. The butter theme is particularly trendy because of its simple geometric shape and the comforting, creamy yellow color that reminds people of delicious home cooking. If you want to see more creative ideas, check out this butter squishy resource for different variations and styles.
The Sensory Experience
The main reason people want to know how to make a realistic butter squishy at home is the sensory feedback. A high-quality squishy provides a tactile sensation that many find stress-relieving. The “slow-rise” factor is the gold standard for these toys. When you create your own, you can control exactly how soft or firm the foam is, allowing you to customize the experience to your liking. This makes the DIY process much more rewarding than simply buying a mass-produced version from a store.
The Aesthetic of Miniature Food
There is a massive community dedicated to miniature food items. Butter is a staple in many households, and its iconic rectangular block shape is instantly recognizable. When you figure out how to make a realistic butter squishy at home, you are participating in a craft that celebrates everyday objects. The goal is to make the foam look so much like real dairy that someone might actually mistake it for a stick of butter if they saw it from across the room. This realism is achieved through careful painting and shaping.
Print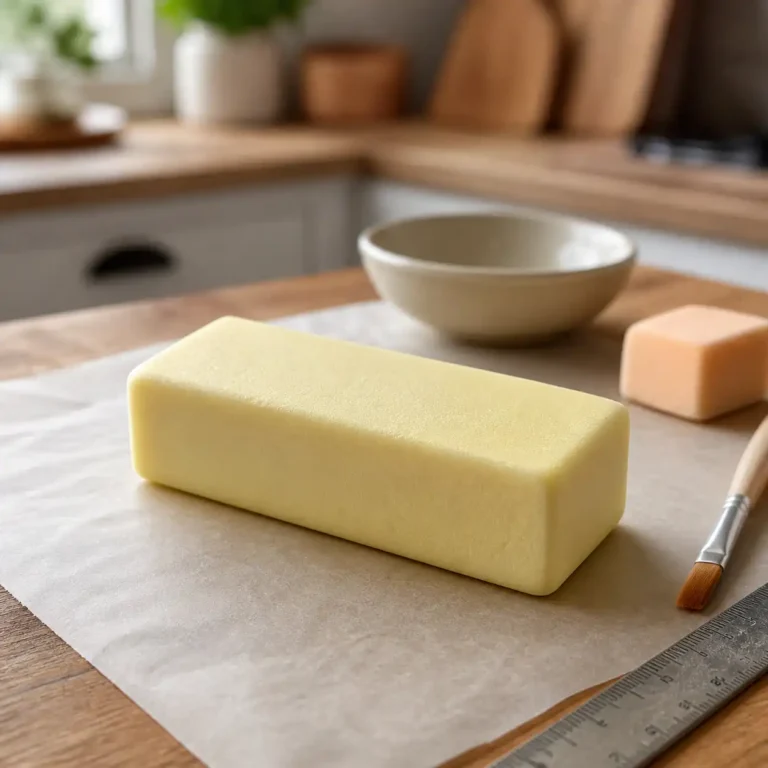
How to Make a Realistic Butter Squishy at Home
Learn to create your own realistic slow-rising butter squishy at home with this fun and relaxing craft project. These DIY foam toys are incredibly satisfying to squeeze and mimic the look of real butter, perfect for stress relief and collecting miniature food items.
- Total Time: 3 hours
- Yield: 1 Butter Squishy
Ingredients
- Slow-rise foam block (yellow or white)
- Craft knives or sharp scissors
- Fine-grit sandpaper
- Acrylic paints (yellow, white, brown/tan)
- Paintbrushes (various sizes)
- Sealant spray or clear varnish (matte or satin finish)
- Optional: Ruler, cutting mat
Instructions
- Step 1: Prepare Foam Block – Cut your slow-rise foam block to the desired rectangular shape and size of a stick of butter.
- Step 2: Shape and Refine – Use fine-grit sandpaper to smooth all edges and surfaces, creating a realistic, slightly rounded butter block appearance.
- Step 3: Apply Base Coat – Paint the entire foam block with a base coat of yellow acrylic paint. Let it dry completely.
- Step 4: Add Realistic Detail – Mix small amounts of white and light brown acrylic paints with your yellow to create varied, creamy shades. Lightly brush and blend these colors onto the squishy to mimic the natural texture and color variations of real butter. Focus on making it look slightly uneven.
- Step 5: Dry Thoroughly – Allow all layers of paint to dry completely. This may require several hours, especially if multiple coats were applied.
- Step 6: Seal and Protect – Apply a sealant spray or clear varnish (matte or satin finish recommended) over the entire squishy. This protects the paint and gives the squishy its final look and feel. Let it cure fully before handling.
Notes
Ensure each paint layer dries completely before applying the next to prevent smudging. Experiment with color blending to achieve the most realistic butter hue. A cutting mat and ruler can help achieve precise cuts for the foam block.
- Prep Time: 30 minutes
- Cook Time: 60 minutes
- Category: Crafts
- Method: Molding, Painting
- Cuisine: N/A
- Diet: Not Edible
Nutrition
- Serving Size: 1 squishy (not edible)
- Calories: 0 kcal (not edible)
- Sugar: 0 g (not edible)
- Sodium: 0 mg (not edible)
- Fat: 0 g (not edible)
- Saturated Fat: 0 g (not edible)
- Unsaturated Fat: 0 g (not edible)
- Trans Fat: 0 g (not edible)
- Carbohydrates: 0 g (not edible)
- Fiber: 0 g (not edible)
- Protein: 0 g (not edible)
- Cholesterol: 0 mg (not edible)
Keywords: butter squishy, DIY, craft, foam toy, slow-rise, stress relief, miniature food, handmade toy
Essential Materials for Your DIY Project

To successfully learn how to make a realistic butter squishy at home, you need the right tools. You cannot just use any old sponge from the sink; the material needs to have specific properties to give you that classic squishy feel. Most professional-looking DIY squishies use memory foam or high-density upholstery foam. You will also need paints that are flexible so they do not crack when you squeeze the toy. Standard acrylic paint by itself is usually too brittle, so we mix it with other ingredients to keep it stretchy.
Choosing the Right Foam
The most important part of how to make a realistic butter squishy at home is the foam. According to the general definition of squishy toys found on Wikipedia, these items are often made from soft polyurethane. For a home project, look for memory foam pillows or “soft” density cosmetic sponges. Memory foam has the best slow-rise effect. If the foam is too bouncy, it will pop back instantly, which takes away from the satisfying “butter” feel we are aiming for in this project.
Paint and Adhesives
For the exterior, you will need fabric paint or “puffy” paint. These are designed to move with the fabric, which means they will not flake off when the foam is compressed. To get the perfect butter color, you will need white, yellow, and a tiny bit of orange or brown to create a natural, creamy shade. Avoid using markers or spray paint, as these can harden the foam and ruin the texture. Knowing how to make a realistic butter squishy at home means respecting the chemistry of the materials so the toy lasts a long time.
Step-by-Step Instructions
Now we get to the core of the project. Follow these steps carefully to achieve the best results. Remember that patience is key, especially when it comes to drying times. If you rush the process, the paint might stick to your fingers or the foam might lose its shape. Here is the definitive guide on how to make a realistic butter squishy at home.
- Step 1: Prepare Your Workspace – Clear a flat surface and lay down some parchment paper or a silicone mat. This prevents the foam and paint from sticking to your table. Since you will be working with paints, make sure the area is well-lit so you can see the subtle color changes in your “butter” stick.
- Step 2: Measure the Foam – Take your block of memory foam and mark out a rectangle. Standard butter sticks are usually about 4.7 inches long and 1.3 inches wide. Use a ruler to be precise, as this accuracy helps you understand how to make a realistic butter squishy at home that looks authentic.
- Step 3: Cut the Base Shape – Using sharp fabric scissors or a serrated bread knife, carefully cut the foam along your marks. Try to make long, smooth cuts rather than small snips. This reduces the number of jagged edges you will have to fix later. Smoothness is vital for a realistic look.
- Step 4: Trim and Sand the Edges – Real butter sticks have slightly rounded or very clean edges. Use small scissors to trim any bits of foam that are sticking out. You can even use a fine-grit sandpaper to gently buff the surface of the foam. This makes the paint go on much more evenly.
- Step 5: Mix Your Butter Color – In a small bowl, mix white fabric paint with a few drops of yellow. Add the yellow slowly until you reach a pale, creamy custard color. If it looks too bright or “neon,” add a tiny dot of brown to ground the color. Getting the color right is a huge part of how to make a realistic butter squishy at home.
- Step 6: Apply the First Coat – Use a makeup sponge or a soft brush to dab the paint onto the foam. Do not brush it on too thick, as this can clog the pores of the foam and stop it from rising. Dabbing creates a texture that looks more like real food. Let this coat dry completely for at least four hours.
- Step 7: Add a Second Coat – Once the first layer is dry, apply a second coat to hide the texture of the foam beneath. This ensures the color is solid and vibrant. Learning how to make a realistic butter squishy at home involves building up these layers to give the toy its durable “skin.”
- Step 8: Final Drying – Let your squishy sit undisturbed for 24 hours. Even if it feels dry to the touch, the inner layers of paint need time to set. If you squeeze it too early, you might cause the paint to crack or peel away from the foam.


Advanced Tips for Realistic Textures
Once you have mastered the basic steps of how to make a realistic butter squishy at home, you might want to try some advanced techniques. Real butter isn’t always a perfectly uniform color. Sometimes it has a slight sheen or a bit of “sweat” if it has been sitting out. You can mimic these details using a clear gloss sealer or a very thin layer of silicone. This adds a level of professional quality to your handmade toy that makes it stand out from cheaper versions.
Creating the “Melted” Look
If you want to get creative, you can make a squishy that looks like it is starting to melt. You can do this by adding a “drip” of puffy paint on one side of your block. If you are a fan of buttery textures in food, you might be familiar with the golden pool of butter in recipes like butter swim biscuits easy, where the butter is a central feature. You can use that visual as a reference to paint a darker yellow “puddle” on your squishy for a fun, artistic touch.
Adding Shading and Highlights
To make the object look 3D and “pop,” use a slightly darker yellow paint in the corners and a lighter, almost white paint on the top flat surface. This mimics the way light hits a solid object. When people ask how to make a realistic butter squishy at home, they are often surprised at how much a little bit of shading can change the final look. Use a dry brush technique to blend these colors so the transitions look natural rather than striped.
Customizing Your Butter Squishy
The beauty of the DIY approach is that you can make your toy unique. Maybe you want “herb butter” or “honey butter.” You can add small green specks of paint to represent parsley or a darker amber swirl for honey. This variety is what makes the hobby so addictive. Once you know how to make a realistic butter squishy at home, you can start a whole collection of different “flavors.”
Savory Butter Variations
Think about the types of butter used in cooking. For instance, many people love the look of herb-infused fats used in dishes like garlic butter chicken bites skillet where the butter is speckled with spices. You can recreate this by mixing tiny bits of dried green foam or dark green paint into your top coat. It adds a rustic, gourmet feel to your squishy that looks great on a shelf.
Packaging Your Creation
To go the extra mile, create a paper wrapper for your squishy. You can print out a vintage-style butter label and wrap it around the center of your foam block. Just make sure the paint is 100% dry before you do this. Use a small piece of clear tape to hold the paper in place. This makes the squishy look like it just came from the grocery store and provides a great way to present it as a gift to a friend who loves miniatures.
Maintenance and Care
After you have spent time learning how to make a realistic butter squishy at home, you want to make sure it stays in good condition. Squishies can be delicate, especially the handmade variety. Over time, the paint might start to wear down if you squeeze it constantly. Proper care involves keeping it clean and avoiding harsh environments that could damage the foam or the finish.
Cleaning Your Squishy
If your butter squishy gets dusty, do not submerge it in water. Foam acts like a sponge and will trap moisture inside, which can lead to mold. Instead, use a damp cloth to gently wipe the surface. If it becomes sticky, you can apply a very small amount of cornstarch or baby powder. This will give it a smooth, matte finish and prevent it from sticking to other toys in your collection. This is a vital part of knowing how to make a realistic butter squishy at home for the long term.
Storage Tips
Store your squishy in a cool, dry place. Avoid leaving it in direct sunlight, as the UV rays can cause the yellow paint to fade or the foam to become brittle. Also, try not to stack heavy items on top of it. Even though it is designed to be squeezed, permanent pressure over several days can “set” the foam in a crushed position, ruining the slow-rise effect you worked so hard to achieve. Keeping it in a small plastic container or a display case is usually the best option.
Comparing Materials for Squishy Making
To help you decide which materials to buy, let’s look at a comparison of the different types of foam you might encounter when researching how to make a realistic butter squishy at home. Each has its pros and cons depending on your skill level and how much you want to spend.
| Foam Type | Rise Speed | Ease of Cutting | Best Use Case |
|---|---|---|---|
| Memory Foam | Very Slow | Moderate | Realistic, high-quality squishies |
| Cosmetic Sponge | Medium | Very Easy | Small, detailed butter pats |
| Upholstery Foam | Fast | Easy | Large, budget-friendly projects |
| PU Casting Foam | Customizable | Difficult (Requires Molds) | Professional-grade toys |
Troubleshooting Common Issues
Even when you follow the steps on how to make a realistic butter squishy at home perfectly, things can go wrong. Maybe your paint is peeling, or the foam isn’t as “squishy” as you hoped. Do not get discouraged! Most of these issues have easy fixes that will help you improve your skills for the next time you start a project. Crafting is all about trial and error.
Why Is My Paint Peeling?
Paint usually peels if the foam wasn’t clean or if the paint itself isn’t flexible enough. Always make sure to use fabric paint or a mix of acrylic and fabric glue. If you used a material that creates a firm texture, like unflavored gelatin powder might in a food recipe, you would get a jiggly result, but in the world of foam, you need “stretch.” If your paint peels, you can gently sand off the loose bits and apply a new layer of flexible fabric paint mixed with a little bit of water to help it soak into the foam pores.
The Foam Is Too Stiff
If your squishy feels like a rock, you might have applied the paint too thickly. The paint creates a seal that prevents air from escaping and entering the foam. To fix this, you can take a very thin needle and poke a few tiny holes in inconspicuous places, like the bottom of the butter stick. This allows the foam to “breathe” again. Next time you learn how to make a realistic butter squishy at home, remember that thin layers are always better than one thick coat.
Safety Considerations
While making squishies is generally safe, you should always be careful when using sharp tools and chemicals. Cutting foam requires a sharp blade, so younger crafters should always have adult supervision. Additionally, some paints and glues can have strong fumes. It is always a good idea to work in a well-ventilated room or even outside if the weather is nice. This makes the experience more pleasant and keeps everyone safe.
Handling Adhesives and Paints
Some people use silicone caulking to give their squishies a very realistic, rubbery skin. If you choose this method, wear gloves, as silicone can be very difficult to wash off your skin once it starts to cure. Make sure you are not allergic to any of the materials you are using. Knowing how to make a realistic butter squishy at home safely means reading the labels on your paint bottles and following the manufacturer’s directions for drying and handling.
Environmentally Friendly Options
If you are worried about the waste created by foam, you can try to upcycle old materials. An old memory foam pillow that has lost its shape for sleeping can be chopped up into dozens of squishies. This is a great way to recycle and gives you plenty of material to practice your cutting and painting techniques. Plus, it makes the cost of learning how to make a realistic butter squishy at home almost zero!
FAQs
Can I use a regular kitchen sponge to make a squishy?
You can, but it won’t have the “slow-rise” effect. Regular sponges are designed to bounce back immediately to hold water. For a true squishy experience, memory foam is the way to go. However, if you are just practicing your painting, a kitchen sponge is a cheap way to start.
How do I make the squishy smell like real butter?
You can add a few drops of butter-flavored scents or essential oils to your paint mixture. There are many “scent oils” available online that mimic food smells. Just be careful not to add too much, as oil can sometimes break down the foam or affect how the paint dries.
How long will my homemade squishy last?
If handled gently and stored correctly, a DIY squishy can last for several years. The main factor is the quality of the paint. If the paint remains flexible, it won’t crack. Over time, the foam might lose some of its “squish,” but it will still look great on display.
What if I don’t have fabric paint?
You can try mixing regular acrylic paint with clear school glue (like Elmer’s). This makes the acrylic more flexible. It isn’t as effective as professional fabric paint, but it works well for a beginner project. Just make sure to test it on a small scrap of foam first to see how it reacts.
Conclusion
Learning how to make a realistic butter squishy at home is a rewarding hobby that combines art, sculpture, and sensory play. By choosing the right foam, mixing the perfect creamy yellow, and applying patient painting techniques, you can create a toy that looks good enough to eat. Whether you are making these for yourself or as a unique gift for a friend, the process is sure to bring a smile to your face. Grab your scissors and foam, and start crafting your buttery creation today!
Non-Edible Recipe Disclaimer: This content is intended for crafting, DIY, and entertainment purposes only. The materials and instructions shared in this category are not food recipes and are not safe for consumption. Do not eat, taste, or serve any finished project. Keep craft materials away from young children and pets, and always use supplies according to their safety labels.