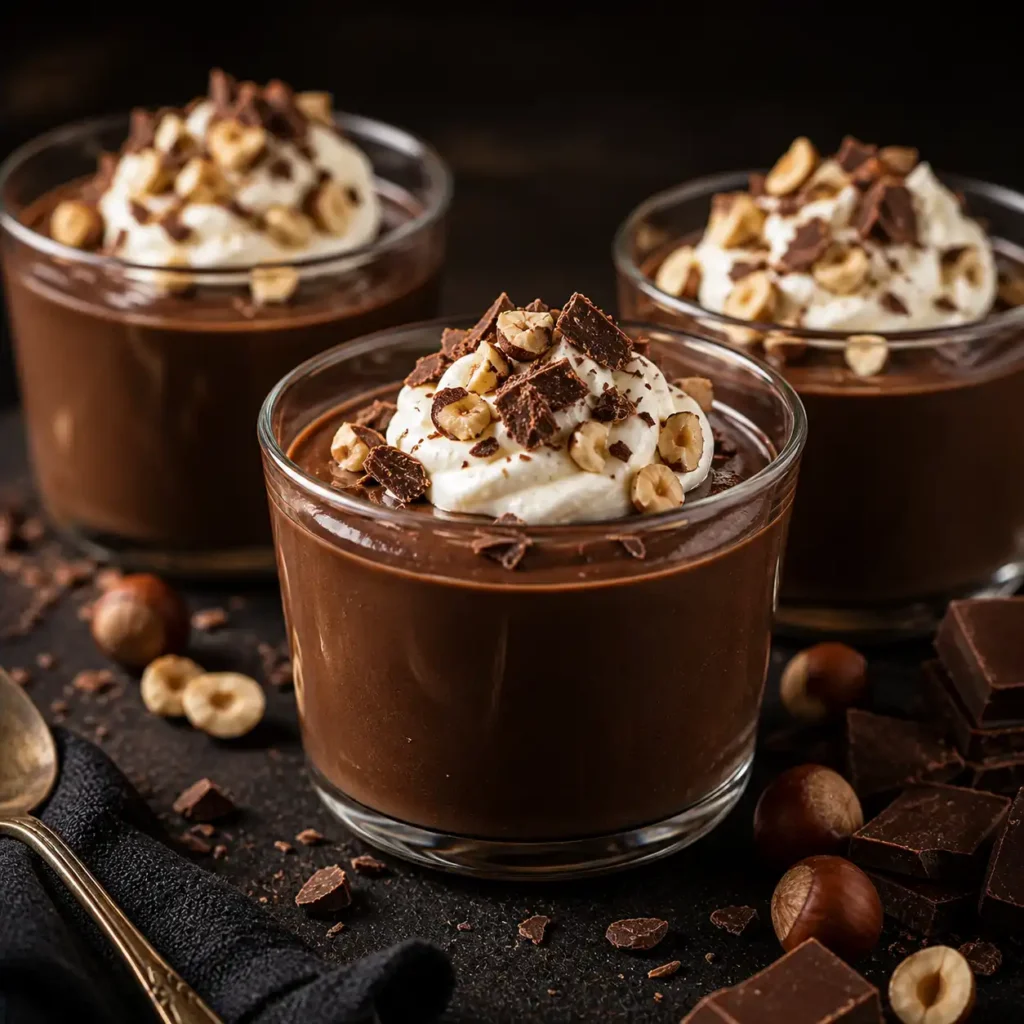
Imagine a dessert that’s rich, velvety, and bursting with the incredible flavor of roasted hazelnuts blended with fine chocolate. That’s exactly what you get with homemade gianduja budino, a delightful Italian pudding that promises a truly special experience. This indulgent treat is simpler to make at home than you might think, allowing you to enjoy a gourmet dessert right from your own kitchen. Get ready to create a masterpiece that will charm everyone who tries it.
What is Gianduja Budino? Understanding This Italian Gem
The name “homemade gianduja budino” itself tells a story of culinary delight, combining two exquisite Italian traditions. At its heart, a budino is a creamy Italian pudding, similar in texture to a French pot de crème or a rich custard. It’s often thickened with eggs, starch, or sometimes gelatin, and served chilled, offering a smooth and luxurious mouthfeel that melts wonderfully.
Table of Contents
The Charm of Budino: A Classic Italian Pudding
Budino, in Italian, simply means “pudding.” However, calling it just “pudding” doesn’t quite do it justice. Italian budino is renowned for its silken texture and deep, concentrated flavors. From vanilla to caramel, and of course, chocolate, the variations are endless. It’s a comforting dessert, often enjoyed in small portions because of its richness, making each spoonful a moment to savor. Crafting a homemade gianduja budino begins with appreciating this classic foundation.
Gianduja: The Chocolate Hazelnut Marvel
Gianduja is a sweet chocolate spread that contains about 30% hazelnut paste. Originating in Turin, Italy, during Napoleon’s reign when cocoa supplies were limited, confectioners cleverly extended their chocolate by mixing it with local hazelnuts. The result was a delicious revelation, and gianduja quickly became a beloved treat. Today, it forms the basis for many incredible desserts, including the star of our show, homemade gianduja budino. If you want to learn more about the history of this wonderful confection, you can read about Gianduja on Wikipedia.
The Perfect Pair: Gianduja Meets Budino
When gianduja and budino come together, magic happens. The intense, nutty flavor of hazelnuts combined with the sweetness of chocolate creates a complex, irresistible profile. This particular homemade gianduja budino is a celebration of these two elements, offering a dessert that is both familiar and exciting. It’s not just a chocolate pudding; it’s a gourmet experience, deeply flavored and wonderfully satisfying, making it a truly memorable treat for any occasion.
Print
Homemade Gianduja Budino
A rich, velvety Italian pudding featuring the classic combination of roasted hazelnut paste and fine dark chocolate. This gourmet dessert offers a silken texture and a deeply concentrated flavor profile that melts beautifully on the palate.
- Total Time: 4 hours 35 minutes
- Yield: 4 servings 1x
Ingredients
- 1 cup roasted hazelnuts, skins removed
- 2 cups whole milk
- 1/2 cup heavy cream
- 1/2 cup granulated sugar
- 3 large egg yolks
- 2 tablespoons cornstarch
- 6 ounces high-quality dark chocolate (60% cocoa), finely chopped
- 1 teaspoon vanilla extract
- 1/4 teaspoon sea salt
- Whipped cream for garnish
- Crushed roasted hazelnuts for topping
Instructions
- Step 1: Create Hazelnut Paste – Process roasted hazelnuts in a food processor for 5 minutes until a smooth, liquid paste forms.
- Step 2: Heat Dairy – Combine milk and heavy cream in a medium saucepan over medium heat until it reaches a gentle simmer.
- Step 3: Mix Yolks – In a separate bowl, whisk together egg yolks, sugar, cornstarch, and salt until the mixture is pale and thick.
- Step 4: Temper Mixture – Slowly drizzle one cup of the hot milk into the egg mixture while whisking constantly to prevent curdling.
- Step 5: Thicken Custard – Pour the tempered egg mixture back into the saucepan and cook over medium-low heat, stirring constantly until thick.
- Step 6: Melt Chocolate – Remove from heat and stir in the chopped chocolate, hazelnut paste, and vanilla until completely smooth and glossy.
- Step 7: Strain Pudding – Press the mixture through a fine-mesh sieve into a clean bowl to ensure a perfectly silken, lump-free texture.
- Step 8: Portion and Chill – Divide the budino into four ramekins and press plastic wrap directly onto the surface to prevent skin from forming.
- Step 9: Set Dessert – Refrigerate for at least 4 hours, or overnight, until completely set and chilled.
- Step 10: Final Garnish – Top with a dollop of whipped cream and a sprinkle of crushed hazelnuts before serving.
Notes
For the most authentic flavor, use high-quality Italian hazelnuts (Nocciola del Piemonte). Ensure the plastic wrap touches the surface of the pudding to maintain that signature smooth budino top.
- Prep Time: 20 minutes
- Cook Time: 15 minutes
- Category: Dessert
- Method: Stovetop
- Cuisine: Italian
- Diet: Vegetarian
Nutrition
- Serving Size: 1 ramekin
- Calories: 485 kcal
- Sugar: 29 g
- Sodium: 65 mg
- Fat: 36 g
- Saturated Fat: 14 g
- Unsaturated Fat: 18 g
- Trans Fat: 0.4 g
- Carbohydrates: 38 g
- Fiber: 4 g
- Protein: 8 g
- Cholesterol: 165 mg
Keywords: Gianduja, Budino, Italian Pudding, Chocolate Hazelnut, Custard, Gourmet Dessert
Why Create Homemade Gianduja Budino? The Joys of DIY Dessert
Making your own desserts from scratch always brings a special satisfaction, and homemade gianduja budino is no exception. Beyond the sheer pleasure of baking, there are practical advantages to preparing this luxurious treat in your own kitchen. You gain control over ingredients, tailor flavors to your liking, and enjoy the freshest possible result, all while creating something truly impressive.
Control Over Ingredients for a Better Budino

One of the biggest advantages of making homemade gianduja budino is the ability to select high-quality ingredients. You can choose premium chocolate, fresh dairy, and the finest hazelnuts, all of which contribute to a superior flavor and texture. This control allows you to avoid artificial flavors or preservatives often found in store-bought versions, giving you a purer, more natural dessert. Knowing exactly what goes into your food brings peace of mind and contributes to a fantastic final product.
Tailoring Sweetness and Texture to Your Taste
Do you prefer your desserts a little less sweet? Or perhaps you love an extra-rich, dense pudding? When you craft your own homemade gianduja budino, you have the freedom to adjust the sugar content and the thickening agents to perfectly match your preferences. This customization means your budino will be exactly how you like it, a personalized treat that truly hits the spot. This level of personalization is simply not possible with pre-made options.
The Satisfaction of Crafting a Gourmet Treat
There’s a unique joy that comes from creating something delicious with your own hands. The process of roasting hazelnuts, melting chocolate, and gently cooking a custard is a rewarding culinary journey. Presenting a stunning homemade gianduja budino to family and friends is incredibly gratifying, earning you compliments and spreading smiles. It’s more than just a dessert; it’s a labor of love that tastes amazing.
Essential Ingredients for Your Homemade Gianduja Budino
To make the perfect homemade gianduja budino, you’ll need a combination of rich, fresh ingredients. Each component plays a vital role in achieving that signature creamy texture and deep chocolate-hazelnut flavor. Gathering these items beforehand will make your cooking process smooth and enjoyable, leading to a truly delicious result.
The Star: Quality Gianduja (or Hazelnuts and Chocolate)
The foundation of your homemade gianduja budino is, naturally, gianduja. You can use a high-quality store-bought gianduja spread or bars, which offer convenience and consistent flavor. Alternatively, for an even fresher taste, you can make your own gianduja by roasting hazelnuts and blending them with chocolate and a touch of sugar. This extra step adds a wonderful depth of flavor that is hard to beat.
Dairy Dream: Milk and Cream
For that ultra-creamy, decadent texture, a mix of whole milk and heavy cream is essential. The fat content in both helps to create a rich mouthfeel and carry the flavors beautifully. Using full-fat dairy products is recommended for the best results in your homemade gianduja budino, contributing significantly to its luxurious nature. Skimping on the dairy here might lead to a less satisfying texture.
Sweeteners and Thickeners: Sugar, Eggs, and a Touch of Starch/Gelatin
Granulated sugar provides the perfect level of sweetness, balancing the richness of the gianduja. Eggs, particularly egg yolks, are crucial for thickening the budino and giving it a silky texture, as well as adding to its richness. Sometimes, a small amount of cornstarch or even gelatin is used to assist in setting the pudding, helping to achieve that perfect consistency. For those interested in recipes that incorporate gelatin, you might find inspiration in Dr. Gupta’s gelatin recipe for other dessert ideas.
Flavor Boosters: Vanilla and Salt
A touch of vanilla extract deepens the overall flavor profile, complementing the chocolate and hazelnut without overpowering them. A tiny pinch of salt is equally important, as it helps to bring out the sweetness and complexity of the other ingredients, making the homemade gianduja budino truly shine. These small additions make a big difference in the final taste.
Making Homemade Gianduja: A Foundation for Perfection (Optional)
While you can certainly use store-bought gianduja for your budino, making it from scratch offers unparalleled freshness and flavor. The process is straightforward and yields a deeply aromatic hazelnut-chocolate paste that will elevate your homemade gianduja budino to new heights. If you have the time, this extra step is truly worth the effort.
Step 1: Roast the Hazelnuts to Perfection
Begin by spreading raw hazelnuts in a single layer on a baking sheet. Roast them in a preheated oven at 350°F (175°C) for about 10-15 minutes, or until their skins begin to crack and they smell wonderfully fragrant. This roasting step is key to bringing out their full nutty flavor. Keep a close eye on them to prevent burning.
Step 2: Remove Skins and Blend into a Smooth Paste
Once roasted, transfer the hot hazelnuts to a clean kitchen towel. Rub them vigorously to remove their skins, which can add a bitter note. Don’t worry if a few stubborn skins remain. Place the skinned hazelnuts into a food processor and blend. Initially, they’ll turn into a coarse meal, then a sticky butter, and finally, after about 10-15 minutes, a smooth, runny hazelnut butter.
Step 3: Combine with Chocolate and Sweetener
Melt your preferred chocolate (milk or dark, depending on your taste) gently in a double boiler or microwave. Add the melted chocolate to the hazelnut butter in the food processor, along with a bit of powdered sugar and a pinch of salt. Blend until thoroughly combined and smooth. Your homemade gianduja is now ready to be used in your homemade gianduja budino, or spread on toast!
The Homemade Gianduja Budino Recipe: Step-by-Step Indulgence
Now for the main event: crafting your own luscious homemade gianduja budino. This recipe is designed to guide you through each stage, ensuring a smooth, creamy, and wonderfully flavorful dessert. Take your time with each step, and you’ll be rewarded with a truly impressive treat that showcases your culinary skills.
Ingredients You’ll Need:
- 1 ½ cups whole milk
- 1 cup heavy cream
- ½ cup granulated sugar (adjust to taste)
- ¼ cup cornstarch
- 3 large egg yolks
- ½ teaspoon salt
- 4 ounces (about 113g) high-quality gianduja, chopped or spread
- 1 teaspoon vanilla extract
Equipment for Success:
- Medium saucepan
- Whisk
- Heatproof bowl
- Fine-mesh sieve
- Rubber spatula
- Small serving ramekins or glasses (4-6, depending on size)
- Plastic wrap
Step 1: Prepare Your Dairy and Gianduja


In a medium saucepan, combine the whole milk and heavy cream. Warm this mixture over medium heat until it just begins to simmer around the edges, but do not let it boil. Remove the saucepan from the heat. Add the chopped gianduja to the warm milk mixture, stirring gently until the gianduja is fully melted and smoothly incorporated. The warmth of the dairy will help the gianduja melt beautifully, creating a rich base for your homemade gianduja budino.
Step 2: Whisk the Egg Yolk Mixture
In a separate heatproof bowl, whisk together the granulated sugar, cornstarch, egg yolks, and salt until the mixture is light in color and smooth. It should be thick and pale yellow. The cornstarch helps to stabilize the egg yolks and provides additional thickening power for the budino. Make sure there are no lumps in this mixture before proceeding.
Step 3: Temper the Egg Yolks
Slowly drizzle about half of the warm gianduja-milk mixture into the egg yolk mixture, whisking continuously and vigorously. This process, called tempering, gradually raises the temperature of the egg yolks, preventing them from scrambling when they are added to the hot liquid. It’s a crucial step for achieving a silky smooth homemade gianduja budino.
Step 4: Combine and Cook the Budino Base
Pour the tempered egg yolk mixture back into the saucepan with the remaining warm gianduja-milk. Return the saucepan to medium-low heat. Cook, whisking constantly, until the mixture thickens significantly, coating the back of a spoon. It should reach a gentle boil for about 1 minute to activate the cornstarch. This usually takes about 5-8 minutes. Do not stop whisking, as this prevents scorching and ensures even cooking.
Step 5: Strain and Add Vanilla
Once thickened, remove the saucepan from the heat. Stir in the vanilla extract. For an incredibly smooth homemade gianduja budino, pour the mixture through a fine-mesh sieve into a clean bowl. This step catches any small lumps of cooked egg or undissolved cornstarch, ensuring a perfectly luxurious texture. A smooth budino is a happy budino!
Step 6: Portion and Chill Your Budino
Divide the warm gianduja budino mixture evenly among your prepared ramekins or serving glasses. Cover each ramekin tightly with plastic wrap, pressing the wrap directly onto the surface of the budino to prevent a skin from forming. This is important for maintaining that luscious, creamy texture. Transfer the ramekins to the refrigerator and chill for at least 4 hours, or preferably overnight, until fully set and cold.
Tips for a Flawless Homemade Gianduja Budino
Achieving the perfect homemade gianduja budino is all about attention to detail. These tips will help you avoid common pitfalls and ensure your dessert is nothing short of spectacular, from its smooth texture to its rich flavor. A little extra care in the kitchen goes a long way when making this delightful Italian pudding.
Gentle Heat is Key
When cooking the budino, always use medium-low heat and stir constantly. High heat can cause the eggs to scramble, leading to a lumpy texture. Patience is a virtue here; allow the mixture to thicken slowly and steadily. This gentle approach will yield a wonderfully smooth and creamy homemade gianduja budino that sets beautifully.
Don’t Skip the Straining
Even if you’ve whisked diligently, passing the cooked budino mixture through a fine-mesh sieve is a small step that makes a huge difference. It catches any tiny bits of cooked egg or other solids, ensuring your homemade gianduja budino has that signature silky-smooth texture everyone loves. It’s the secret to a truly refined dessert.
Press Plastic Wrap Directly Onto the Surface
To prevent a rubbery “skin” from forming on top of your chilling budino, press plastic wrap directly onto its surface. This seal keeps moisture in and air out, maintaining the creamy texture throughout. This simple trick is essential for preserving the luscious quality of your homemade gianduja budino as it chills.
Creative Variations and Serving Suggestions
While classic homemade gianduja budino is perfect on its own, there are many ways to personalize this delicious dessert. From adding exciting toppings to subtly altering the flavors, these suggestions will help you make your budino even more memorable and suited to your taste or occasion. Get ready to play with flavors and textures!
Toppings to Take Your Budino to the Next Level
A dollop of freshly whipped cream is a classic topping that complements the richness of homemade gianduja budino perfectly. For added texture and flavor, sprinkle some toasted chopped hazelnuts, chocolate shavings, or even a tiny pinch of sea salt to bring out the sweetness. A drizzle of extra gianduja or a dusting of cocoa powder can also make for a beautiful presentation.
Flavor Twists: Experimenting with Your Homemade Gianduja Budino
Feel free to experiment with additional flavorings. A hint of espresso powder can deepen the chocolate notes, creating a coffee-gianduja blend that’s truly sophisticated. A little orange zest grated into the warm milk mixture can add a bright, citrusy counterpoint to the rich chocolate and hazelnut. These small adjustments can dramatically change the character of your homemade gianduja budino.
For those who appreciate varied chocolate desserts, exploring different budino flavors can be fun. You might find inspiration in other recipes like a spiced chocolate budino, which adds a warm, aromatic twist to the classic. Or, if you’re keen on keeping that hazelnut goodness front and center, another chocolate hazelnut budino recipe could offer a slightly different approach or a new technique to try.
Perfect Presentation and Serving Temperature
Homemade gianduja budino is best served chilled. You can serve it directly in the ramekins for individual portions, or if you’ve made it in a single large dish, scoop it into elegant serving bowls. Garnishes add a touch of flair. The cool temperature allows the flavors to fully develop and the creamy texture to be most enjoyable. It’s a dessert that feels refined and comforting at the same time.
Storing and Making Ahead: Planning Your Gianduja Budino
One of the best things about homemade gianduja budino is that it’s a fantastic make-ahead dessert. Preparing it in advance allows the flavors to meld beautifully and saves you time when you’re entertaining or simply want a quick, delicious treat. Proper storage is key to keeping it fresh and delightful.
Refrigeration and Shelf Life
Once chilled and set, homemade gianduja budino can be stored in the refrigerator for up to 3-4 days. Always keep it covered tightly with plastic wrap, pressing the wrap onto the surface to maintain its creamy texture and prevent it from absorbing refrigerator odors. This makes it an ideal dessert to prepare a day or two before an event.
Prepping Components in Advance
If you’re making your own gianduja from scratch, you can prepare the hazelnut-chocolate spread a few days ahead of time and store it in an airtight container at room temperature. This can help break up the cooking process for your homemade gianduja budino, making it less daunting and more enjoyable to assemble when you’re ready.
Troubleshooting Common Homemade Gianduja Budino Issues
Even experienced cooks can encounter a hiccup or two when making a new recipe. But don’t worry, most common budino problems are easy to fix or avoid with a little know-how. Understanding these issues will help you achieve a consistently perfect homemade gianduja budino every time.
Budino Too Thin or Not Setting
If your homemade gianduja budino isn’t setting properly, it usually means it wasn’t cooked long enough or at a sufficient temperature to activate the cornstarch and fully cook the eggs. Make sure to cook the mixture until it visibly thickens and coats the back of a spoon, reaching a gentle boil for at least a minute. If it’s still warm, you can try reheating it gently on the stove while whisking.
Grainy Texture
A grainy texture in your homemade gianduja budino is often a sign of overcooked eggs or not straining the mixture. Remember to temper the eggs slowly and whisk constantly while cooking over medium-low heat. Straining the cooked budino mixture through a fine-mesh sieve is your best defense against any small, grainy bits, ensuring a wonderfully smooth finish.
Skin Forming on Top
As mentioned earlier, a thick skin can form on top of your homemade gianduja budino as it cools. This is easily prevented by pressing plastic wrap directly onto the surface of the warm budino before chilling. This seals in moisture and keeps the top layer as creamy as the rest, preserving the delightful texture you’ve worked hard to achieve.
The Science Behind a Perfect Budino
Understanding the science behind cooking can transform good recipes into great ones. The process of making homemade gianduja budino relies on a few key culinary principles that ensure its delightful texture and rich flavor. Learning about these elements helps you become a more confident and skilled dessert maker.
The Role of Eggs and Starch in Thickening
Egg yolks contain proteins that coagulate when heated, forming a network that thickens the budino. Cornstarch, when heated in a liquid, swells and creates a gel, adding to the pudding’s structure. Together, they create a stable, creamy consistency. Tempering the eggs gradually prevents them from cooking too quickly, allowing for a smooth integration into the hot liquid without scrambling, which is crucial for a smooth homemade gianduja budino.
Melting Chocolate Properly for Smoothness
Gianduja, whether store-bought or homemade, contains cocoa solids and fat. Melting it gently in the warm milk mixture helps to create a smooth, homogenous base for your budino. Overheating chocolate can cause it to seize or become grainy, so a low and slow melting process is always best. This ensures the chocolate integrates seamlessly into your homemade gianduja budino.
The Importance of Chilling and Setting
Chilling isn’t just about serving temperature; it’s vital for the budino to fully set. As the budino cools, the proteins in the eggs and the starch molecules continue to bond and firm up, transforming the liquid custard into a spoonable, luscious pudding. Adequate chilling time ensures your homemade gianduja budino achieves its signature dense yet creamy texture.
Healthier Twists for Your Homemade Gianduja Budino
While homemade gianduja budino is inherently a rich and indulgent dessert, you can make a few smart adjustments to lighten it up slightly without sacrificing too much of its deliciousness. These small changes allow you to enjoy this delightful treat with a little less guilt, making it a more frequent pleasure.
Reduced Sugar Options
You can often reduce the amount of granulated sugar in the recipe by 10-25% without a drastic change in flavor, especially if your gianduja is already quite sweet. Taste as you go, and remember that high-quality gianduja brings a lot of its own sweetness and flavor. For other sweet yet thoughtful treats, considering healthy chocolate snacks can inspire balance in your dessert choices.
Exploring Dairy-Free Alternatives
For those avoiding dairy, you can experiment with plant-based milks and creams. Full-fat coconut milk or a high-quality oat milk can provide a creamy base. Just be aware that these alternatives might impart their own subtle flavors to the homemade gianduja budino, so choose ones that complement chocolate and hazelnut well. You may need to adjust the thickeners slightly, as dairy-free options can behave differently.
Dark Chocolate for Deeper Flavor and Less Sweetness
If you’re making your own gianduja, opt for a darker chocolate (70% cocoa or higher) for a more intense flavor and naturally less sweetness. If using store-bought gianduja, look for varieties with a higher cocoa content. Dark chocolate not only tastes wonderful but can also contribute to a richer, more complex homemade gianduja budino experience while reducing overall sugar.
Pairing Your Homemade Gianduja Budino
A truly great dessert experience isn’t just about the dish itself, but also what you enjoy with it. Homemade gianduja budino, with its deep flavors and creamy texture, pairs wonderfully with a variety of beverages and even other complementary desserts. Discover how to complete your gourmet moment.
Beverage Suggestions to Complement Your Budino
A classic pairing for homemade gianduja budino is a freshly brewed cup of coffee or a rich espresso, as the bitterness of the coffee beautifully contrasts and cuts through the sweetness and richness of the pudding. For a comforting non-caffeinated option, a glass of cold milk or a warm, herbal tea can also be delightful, offering a soothing counterpoint to the indulgent flavors. Consider the experience you want to create.
Serving Alongside Other Desserts
If you’re hosting a dessert spread, homemade gianduja budino can be a fantastic star or a wonderful accompaniment. It pairs well with lighter, fruit-based desserts that offer a refreshing contrast, such as a berry compote or a citrus sorbet. For another delicious chocolate experience, perhaps alongside some best brownie recipes, the budino offers a different texture profile, creating a diverse and appealing dessert selection for your guests.
FAQs
Is homemade gianduja budino difficult to make?
Not at all! While it involves a few steps like tempering eggs and whisking, the process for homemade gianduja budino is quite straightforward. With attention to detail and patience, even beginner cooks can achieve a delicious and impressive result. The key is to follow the instructions carefully and not rush the cooking process.
Can I make homemade gianduja budino dairy-free or vegan?
Yes, you can adapt homemade gianduja budino to be dairy-free by substituting whole milk and heavy cream with full-fat coconut milk, oat milk, or almond milk. For a vegan version, you would also need to replace the egg yolks with a plant-based thickener like additional cornstarch or agar-agar, and ensure your gianduja is dairy-free. Keep in mind that flavor and texture may vary slightly with substitutions.
How long does homemade gianduja budino last in the refrigerator?
When stored properly in individual ramekins or a covered dish with plastic wrap pressed directly onto the surface, homemade gianduja budino will stay fresh and delicious in the refrigerator for about 3 to 4 days. It’s an excellent make-ahead dessert, allowing the flavors to fully develop.
What if I can’t find gianduja? Can I use another chocolate hazelnut spread?
If you can’t find gianduja, you can certainly use a high-quality chocolate hazelnut spread as a substitute for your homemade gianduja budino. Just be aware that the flavor profile might be slightly different, as true gianduja has a specific ratio of hazelnuts to chocolate. Alternatively, you can make your own gianduja at home with roasted hazelnuts and chocolate for the best flavor.
Can I freeze homemade gianduja budino?
While technically possible, freezing homemade gianduja budino is not generally recommended. Freezing and thawing can alter the creamy, delicate texture, sometimes making it slightly grainy or watery. It’s best enjoyed fresh and chilled from the refrigerator. For optimal texture and flavor, plan to consume it within its refrigerated shelf life.
Conclusion: Savoring Your Homemade Gianduja Budino
Creating your own homemade gianduja budino is a truly rewarding culinary adventure, culminating in a dessert that’s both elegant and deeply satisfying. From the rich history of gianduja and budino to the simple steps that bring them together, every part of this journey adds to the enjoyment. You now have all the tools and knowledge to craft a creamy, chocolatey, and delightfully nutty treat that will impress and delight. So go ahead, gather your ingredients, and prepare to indulge in the luscious magic of homemade gianduja budino a true taste of Italian dolce vita.


1 thought on “7 Proven Homemade Gianduja Budino: Your Guide to a Dreamy Italian Chocolate”